Showing posts with label grade 1. Show all posts

Jan 21, 2018

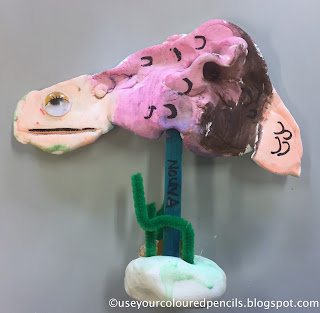
Clay Fish Sculptures


This is a simple sculpture project my grade ones completed a while back. We used Model Magic in order to complete all the sculpting in one day. Although I don't use this product often, this air drying modelling material does allow students to model, add textures and to press bits like the shells, pipe cleaners and googly eyes directly into the clay. The next lesson we were able to paint using tempera paints and enhance details with permanent marker.
 

Jun 11, 2017

Spin Paintings


I saw this activity at 'Casa Maria's Creative Learning Zone' and knew I would have to try it at some point. Her student's results were so beautiful and reminded me of British artist Damien Hirst's Spin Paintings. 

The only place  I know that still sells salad spinners is IKEA. Grab yourself a couple. I then made a cardboard template of a circle that fit the inside of the salad spinner. I had the students trace the template and cut out a couple of circles for themselves out of white paper. The consistency of the paint is important. It needs to be fairly thin and runny. We used liquid watercolours in squeezy bottles. The painting process is best completed in pairs with younger students. One can hold the spinner whilst the other adds paints and spins the lid. Students can open the lid at any time and decide whether to spin more or add more paint. 

The results were exciting and once dry you could incorporate them into another art work. We simply glued ours onto card as an example of experimental painting. We also completed 'Tie Dye with Baby Wipes' in the same lesson.


Tie Dye with Baby Wipes

This is a really easy project that I enjoyed as much as the students. I did this with grade 1 students but I'm sure any year level will enjoy it. The idea comes from 'I Can Teach My Child', where Jenae says you can use either regular textas/markers or liquid watercolours. I found the markers weren't as effective so we used tempera paints. I also discovered that very few children this age could wind the rubber bands around the wipes so you will probably need a helper for young children.

The results were exciting though and once dry you could incorporate them into another art work. We simply glued ours onto card as an example of experimental painting. We also completed 'Spin Paintings' in the same lesson. With older students you could discuss more about the history of the artform and perhaps link it to similar techniques such as Batik.
  

Oct 15, 2016

Paper Plate Flower Collages


My inspiration for this project came from this post at 'Pink Stripey Socks'. They had used four paper plates cut into flower shapes of decreasing size and stapled together. I gave students two paper plates each and one small circle of thick paper for the smallest shape.

I began by asking grade one students to fold their plates in half and drawing a simple pattern of petals around the edge of the semi-circle. They then cut through both layers of the plate (which proved a little difficult for some tiny hands who needed assistance) and unfolded to reveal the whole circle. Once they had cut their three circles, we stapled them together and the children used bright coloured tempera paints to paint their flowers.
Once dry, they also used oil pastels to add more colour and detail and scrap pieces of coloured paper to add leaves and stamen to their flowers. 
They were all quite different and look fantastic displayed together!


Related Posts Plugin for WordPress, Blogger...